
|
|
#1 |
|
Участник
|
dynamicsax-fico: Cost accounting (6)
Источник: https://dynamicsax-fico.com/2017/08/...-accounting-6/
============== This and the following posts will focus on the second pillar of a classical cost accounting system – the cost center accounting pillar. As mentioned in the previous posts on cost accounting, the cost center accounting system associates costs to its origin. The next figure illustrates this association for different kinds of costs (illustrated in the first column) with its origin cost centers.  Because the first three cost centers no. 110, 120 and 130 support all the other operative cost centers, the costs that have been accumulated on the supporting cost centers shall be allocated to the other ‘direct’ or ‘operative’ cost centers.  Within this post, the total direct costs of the supporting cost centers will be allocated to the operating cost centers (no. 210-250) based on the amounts that have been posted on other ledger accounts (cost elements). The next posts will show other, alternative allocation methods and provide a comparison with the allocations that will be generated in the following. Within this post, the total direct costs of the supporting cost centers will be allocated to the operating cost centers (no. 210-250) based on the amounts that have been posted on other ledger accounts (cost elements). The next posts will show other, alternative allocation methods and provide a comparison with the allocations that will be generated in the following.Before costs can be allocated, the different cost elements need to be specified first in the cost element dimension form. In the example used, the primary cost elements were transferred from the General Ledger’s Chart of Accounts (CoA) whereas the secondary cost elements (‘Allocation 110 Supplies’, ‘Allocation 120 Car pool’, ‘Allocation 130 Product management’) were created manually in the cost accounting module to track cost allocations in detail. 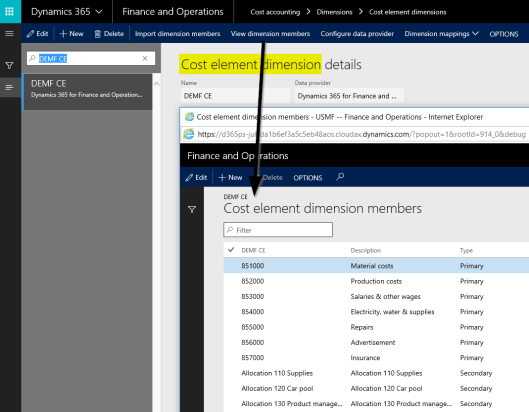 The second required setup for running cost allocations concerns the cost objects; in the example used, the cost centers, which were also transferred from the D365 ledger modules. For details, please see the following screenprint. 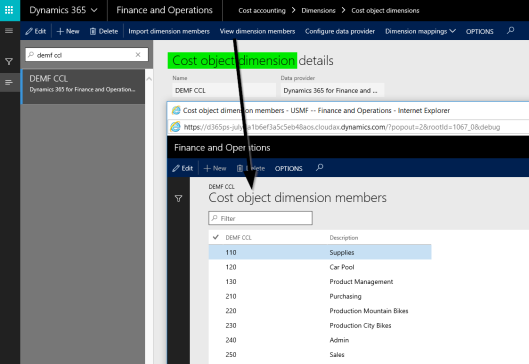 Once cost elements and cost objects are defined, they can be classified in cost element and cost object dimension hierarchies. The set up of those hierarchies is illustrated in the next figures. 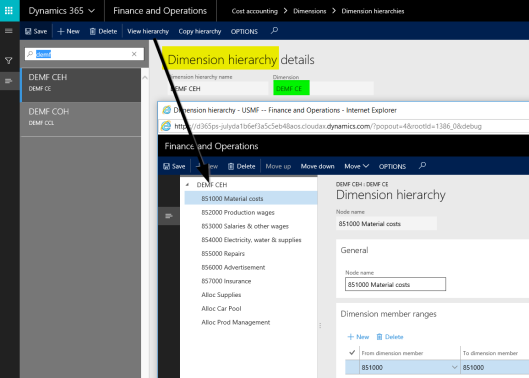  The next setup relates to the cost allocations that shall be executed. Those cost allocations are set up in the cost allocation policy form, which is exemplified below. 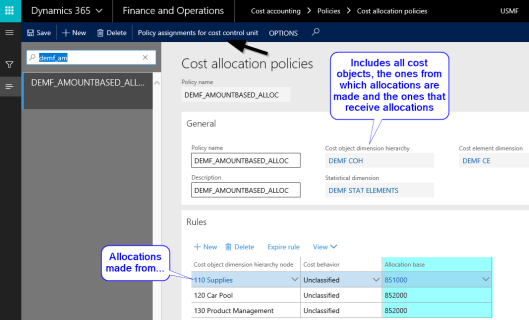 In the cost allocation policy form that is illustrated above, the costs of cost center ‘110 Supplies’ are allocated to the other cost centers based on the amounts that have been posted on ledger account (cost element) 851000. Similarly, the costs of the other supporting cost centers ‘120 Car Pool’ and ‘130 Product Management’ are allocated to the other cost centers based on the amounts that have been posted with ledger account (cost element) 852000.  With the so-called spring release that became publicly available in July 2017, additional predefined allocation bases became available. The next screenprint illustrates some of those predefined allocation bases, which comprise main accounts, cost elements and statistical elements that have been imported into the cost accounting module. With the so-called spring release that became publicly available in July 2017, additional predefined allocation bases became available. The next screenprint illustrates some of those predefined allocation bases, which comprise main accounts, cost elements and statistical elements that have been imported into the cost accounting module. To identify the cost allocations made, a cost rollup policy is set up in addition to the previously shown cost allocation policy. Cost rollup policies establish a linkage between the cost object from where the costs are allocated from and the secondary cost elements that detail the cost allocations for the various cost objects. 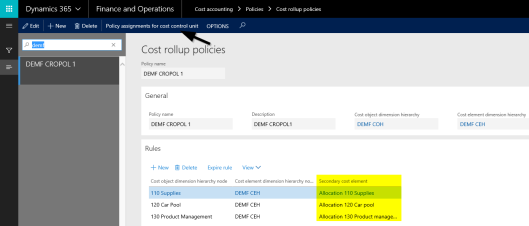 Cost allocation and cost rollup policies do not allocate costs without being assigned to a cost accounting ledger. For that reason, a cost accounting ledger is set up next.  Please note that the arrows shown in the cost allocation and cost rollup policy forms identify the button through which the association between the policies and the cost accounting ledgers is made. Please note that the arrows shown in the cost allocation and cost rollup policy forms identify the button through which the association between the policies and the cost accounting ledgers is made.Similar to what has been shown in prior posts on the cost accounting module, the cost accounting ledger needs a linkage to the cost elements, the cost element hierarchy, cost objects and the cost object hierarchy, which is exemplified in the next figures. 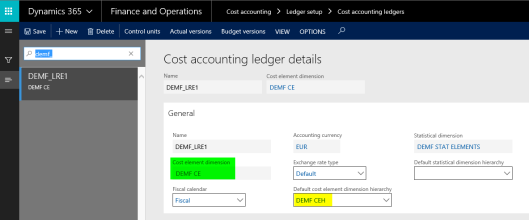  After the cost accounting ledger is setup and after the source data are processed – for details, please see the prior posts – the cost allocation can be executed through the overhead calculation button. 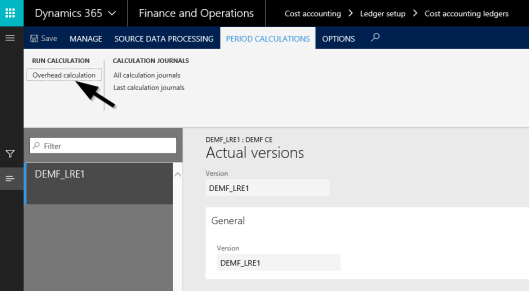 For the illustration of the cost allocations in the cost controlling workspace, the workspace needs to be setup first. This set up is illustrated below. 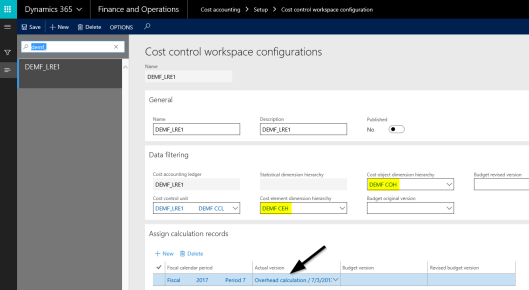  The only major difference in the setup of the cost controlling workspace to what has been shown in the prior posts is that a linkage to the overhead calculation version needs to be made. This is indicated by the arrow in the previous screen. The only major difference in the setup of the cost controlling workspace to what has been shown in the prior posts is that a linkage to the overhead calculation version needs to be made. This is indicated by the arrow in the previous screen.Once also this is made, the cost object data can be analyzed in the cost controlling workspace. The next screenprints document the obtained results.   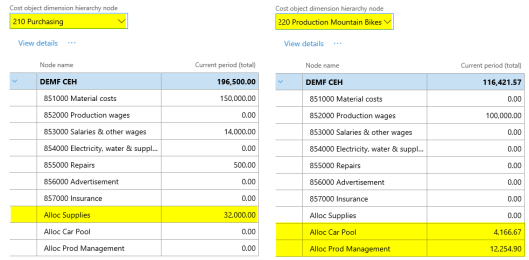  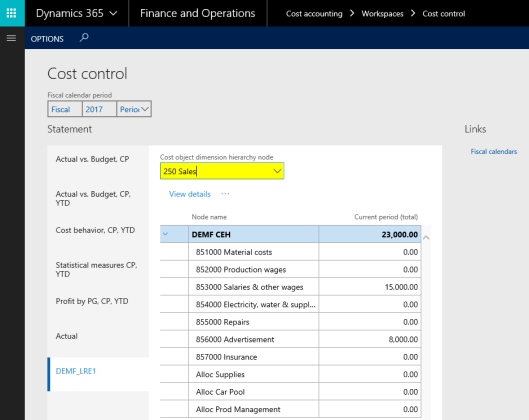 For a better overview, the allocated costs data are summarized and highlighted in the following Excel document. 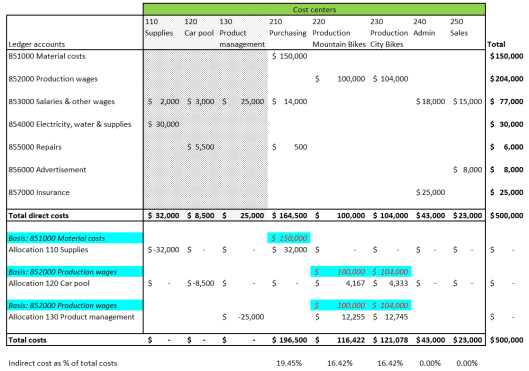 In the next post, we will take a look at an alternative cost allocation methodology that allocates the costs of the supporting cost centers based on the total direct costs recorded on the other cost centers. Till then. Filed under: Cost accounting Tagged: Controlling, Cost accounting module, Cost center accounting, Management Accounting, Predefined dimension member allocations Источник: https://dynamicsax-fico.com/2017/08/...-accounting-6/
__________________
Расскажите о новых и интересных блогах по Microsoft Dynamics, напишите личное сообщение администратору. |
|
|