Источник:
http://www.dynamicsaxtraining.com/dy...n/installation
==============
Agenda
- Introduction
- Domain user, Local user
- Pre-installation
- Installation wizard
- Summary
Introduction
Hello mates!
This lesson shows how to install Dynamics AX 2012. The process is not difficult and similar for all versions of Dynamics AX. Let’s begin.
The most challenging is to find Dynamics AX installation files. If you have access to the Partners source or Customer source, you can find installation files of Dynamics AX 2012
here (DAX2009
here). You can also find the Virtual Machine with the installed DAX and all required applications
here.
This lesson covers all the steps to manually install DAX rather than how to access and work with an already installed virtual machine.
Domain user, Local user
Officially Dynamics AX can be installed only for a domain user. I recommend installing Dynamics AX for a domain user also.
To check that your user is a domain user, navigate to the Computer icon of the Windows explorer, right-click, and select
Properties (or follow this path: Control Panel\System and Security\System). The
System window opens. Here you can find the
Domain field under the
Computer name, domain, and workgroup settings group. If you don’t have this field, your user is not a domain user.
If you want to install Dynamics AX to your laptop that doesn’t have a domain user, you can do that by installing Windows Server, setting up a domain controller, and creating your own domain user. Then install Dynamics AX under that domain user.
If you want to install Dynamics AX 2009 to your laptop under the local user, you will have additional troubles. I have tried to do this but it was unsuccessful.
Pre-installation (SQL Server installation)
To install Dynamics AX, the SQL server is required. You can find and install the Express edition of SQL server 2012 SP2
here.
If you are installing DAX 2009, you should install the Express edition of SQL server 2008 SP2 from
here.
Go to the link and click the
Download button and select the
SQLEXPRADV_x64_ENU.exe file (and SQLManagementStudio_x64_ENU.exe file if you want to browse database) to download.
Note that we need an advanced package. That is because Dynamics AX runs reports on the SSRS server. The SSRS server is not included in a general package.
When the file(s) are saved, run the SQLEXPRADV_x64_ENU.exe file:
- The SQL Server installation center window opens. Click the New SQL server stand-alone installation or add features to an existing installation menu button. (For SQL 2008, the menu button is called “New installation and add new features to an existing installation”)
- The SQL Server 2012 Setup wizard opens. If it is your first SQL server installation, support files will be installed. After that the computer restart is required. You will be notified about this on the Setup Support Rules page.
- Restart the computer if required. Run SQLEXPRADV_x64_ENU.exe again and repeat the step 1.
- The SQL Server 2012 Setup wizard opens. The next License Terms page opens. Select the I accept license terms check box and click Next.
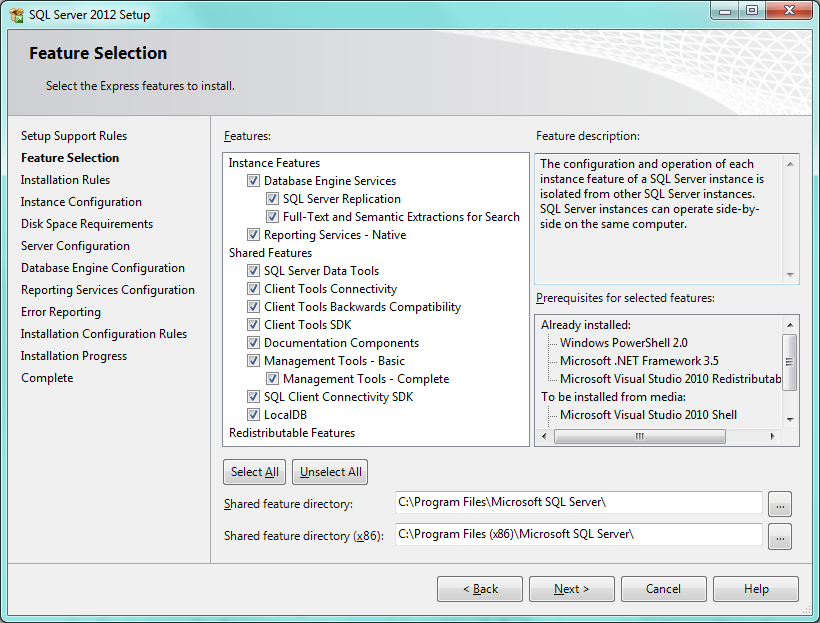
- The Feature Selection page opens. Select all check boxes and click Next.
- On the Installation Rules page, some validation will be done automatically.
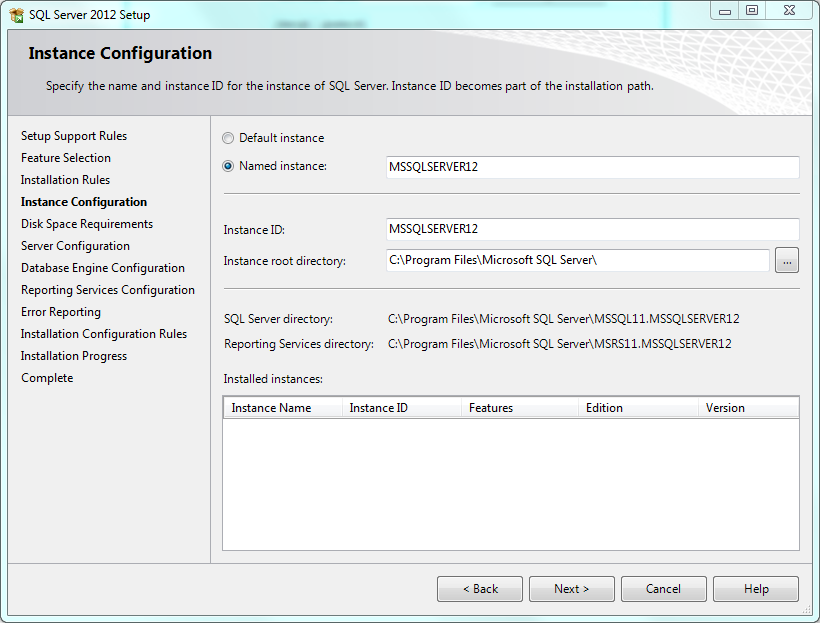
- The Instance Configuration page opens. Select either the Default instance or the Named instance radio button and set the desired name for the SQL server. Click Next.
- On the Disk Space Requirement page, the system will validate the disk space.
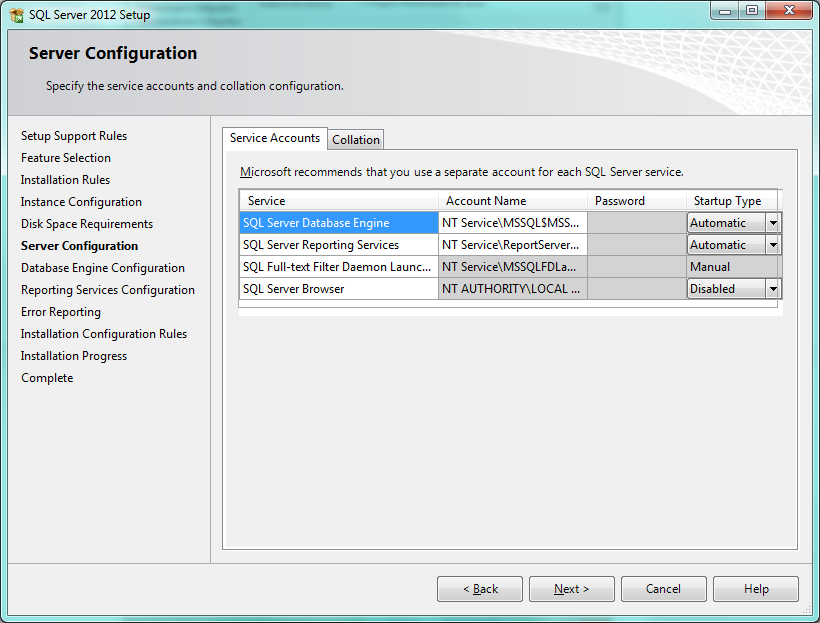
- The Server Configuration page opens. Here, we can set up a user for the SQL server windows service. Leave the default value and click Next.
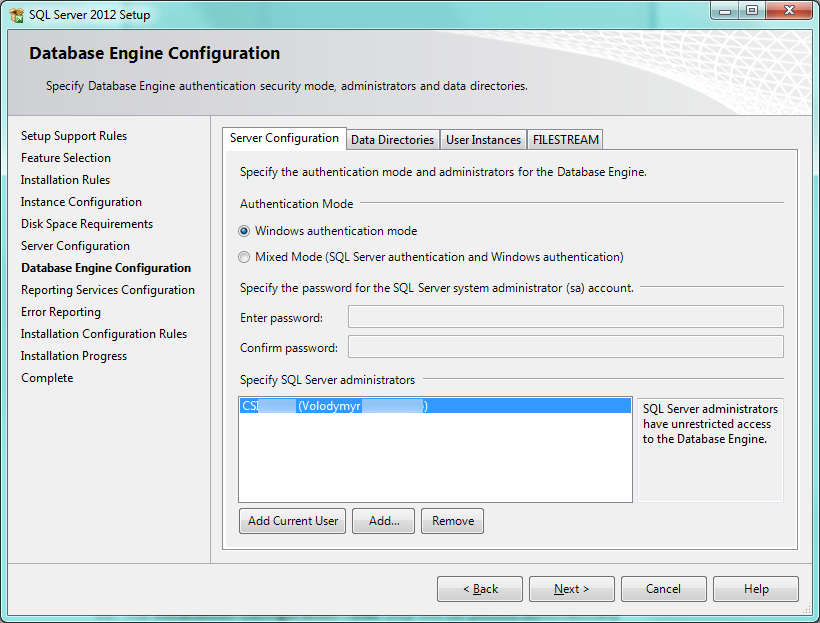
- The Database Engine Configuration page opens. The Mixed Mode is required when you set up under a local user. If you set up under a domain user, the Windows authentication mode is enough. Add your domain user as a sever administrator (if it is not added automatically) and click Next.
- The Reporting Services configuration page opens. Select the Install and configure radio button and click Next.
- The Error Reporting page opens, click Next.
- The Installation Configuration Rules step will be passed automatically.
- The Installation process is started. The process will take up to 1 hour. When it is finished, the Complete window appears. Click Close.
Congratulations! The SQL server and SSRS are successful installed.
To review the results, go to the Windows services and find the
SQL Server and
SQL Server Reporting Services services and makes sure that they are in the
Started mode.
Installation wizard
Now we can set up Dynamics AX. Find the
Setup.exe file in your Dynamics AX installation folder and run it:
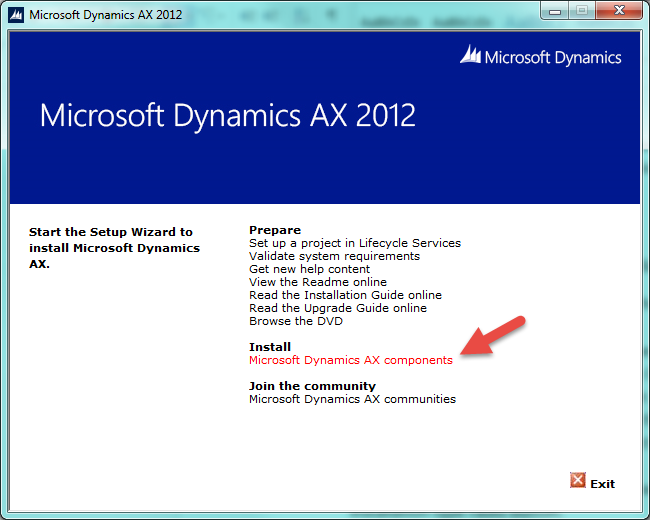
- The Microsoft Dynamics wizard opens. Click the Microsoft Dynamics AX components menu button.
- The Microsoft Dynamics AX Setup wizard with the Welcome page opens. Click Next to continue.
- The License terms page opens, select the I accept the license terms check box and click Next. (This page opens only if you run installation for the first time.)
- The Customer Experience Improvement Program page opens. Select what fits you and click Next. (This page opens only if you run installation for the first time.)
- The Select a file location page opens. I leave the default File location value (“C:\Program Files\Microsoft Dynamics AX\60”). Click Next. (This page opens only if you run installation for the first time.)
- The Ready to install page opens. Clicks the Install Setup will install the support files. (This page opens only if you run installation for the first time.)
- The Select an installation option page opens. Select the Microsoft Dynamics AX radio button and click Next.
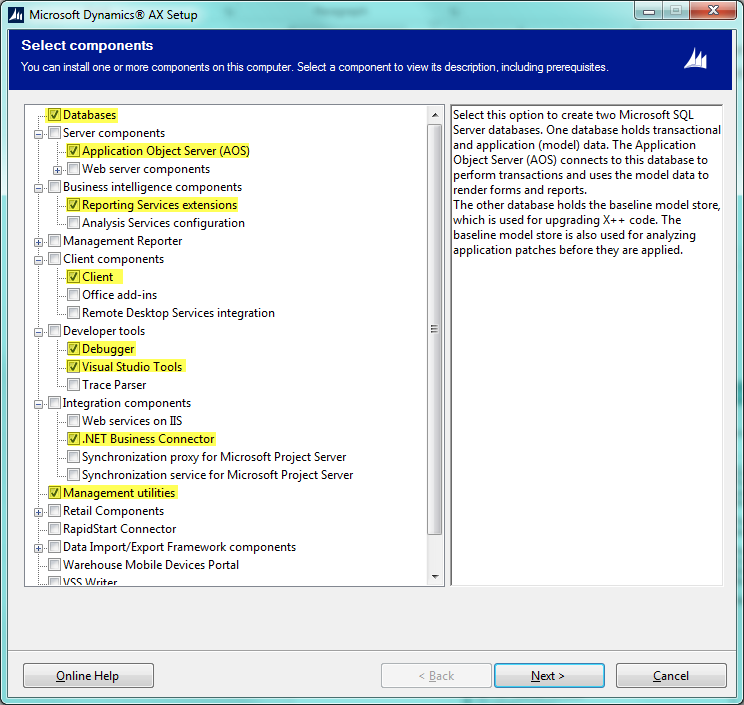
- The Select installation type page opens. To see what will be installed, select the Custom installation type radio button.
- The Select components window appears. Select the following components and click Next
- Database
- Application Object Server (AOS)
- Reporting Services extension (it is used for reports). Info window will appears click Ok.
- Client
- Debugger (for developers)
- Visual studio tools (for developer for SSRS report development)
- .Net Business Connector
- Management utilities
- The Prerequisite Validation page opens. I have 7 Errors.
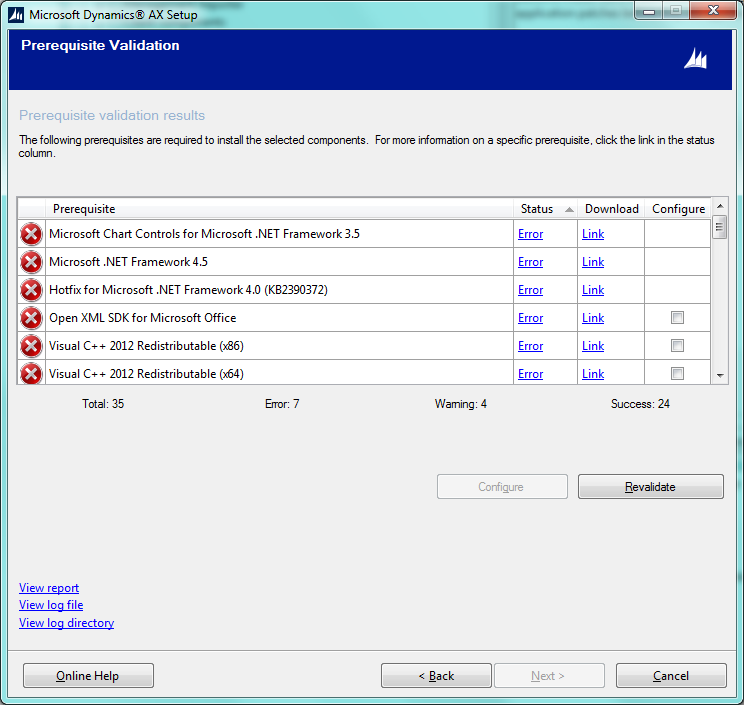
- I have resolved all errors by clicking the Link button and installing all required components. Click Next.
- The Select a file location page opens. I leave the default File location value (“C:\Program Files\Microsoft Dynamics AX\60”). Click Next.
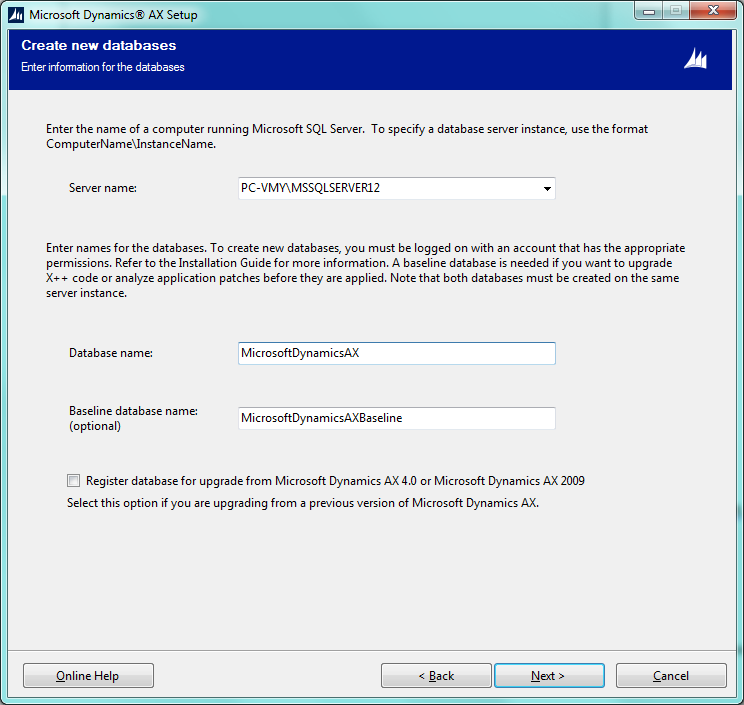
- The Select databases page opens. Select the Create new databases radio button and click Next.
- The Create new databases page opens. The Server name contains the SQL server name (was installed in the previous topic). All fields will be populated automatically, so I leave it as is. Click Next.
- The Select additional models page opens. Select the Foundation Labels and Foundation models and click Next.
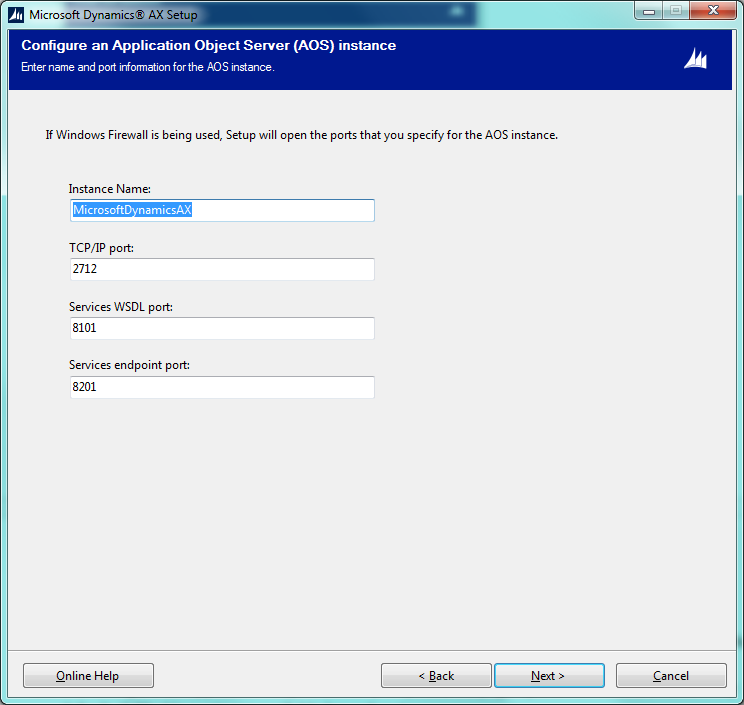
- The Configure an Application Object Server (AOS) instance page opens. All fields are filled in by default. If the fields’ values are acceptable to you leave them as they are. The TCP/Ip port can be changed later in the Dynamics AX Server configuration. Click Next.
- The Specify an AOS account page opens. You can specify your domain account or use the NT Authority local account for AOS. AOS will be installed as a Windows Service. As it often happens in production environment, the new domain user is created and assigned to the AOS. The AOS account can be changed later in the Windows Services. I will specify my domain account as it has all necessary rights and click Next.
- The Select client preference page opens. Here the Dynamics AX Client language is specified. I have set up the English language, the Developer installation type. Now select the Create a desktop shortcut checkbox, and click Next.
- The Specify Business Connector proxy account information page opens. Specify the domain user that will be used by the .Net Business connector to log in to Dynamics AX. Business connector is used by the SSRS reports. I will set up my domain account and click Next.
- The Specify a Reporting Services Instance page opens. The Instance name field will be filled in by default. I leave the instance name and the Deploy report check box selected, and click
- The Prerequisite validation page opens. I have one error – Microsoft Analysis Management Objects. This error is solved by clicking the Link Click Next.
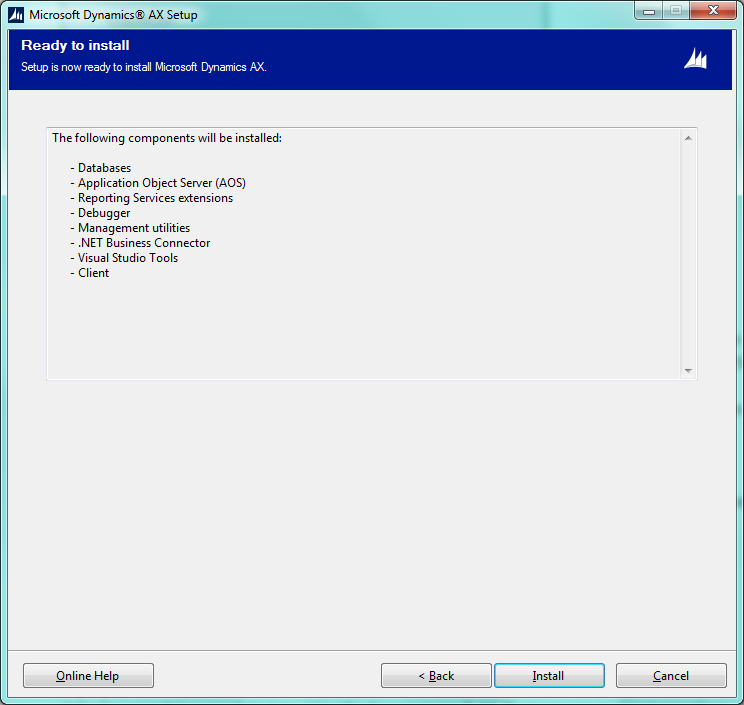
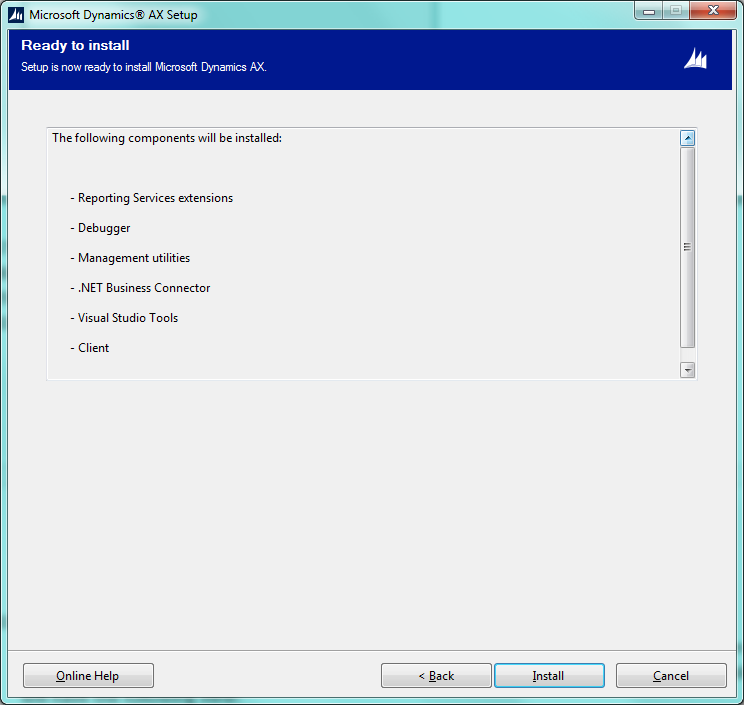
- The Ready to install page opens. Click Install. This process will take about 1 hour.
- When the process is complete, the Setup was not completed page opens.
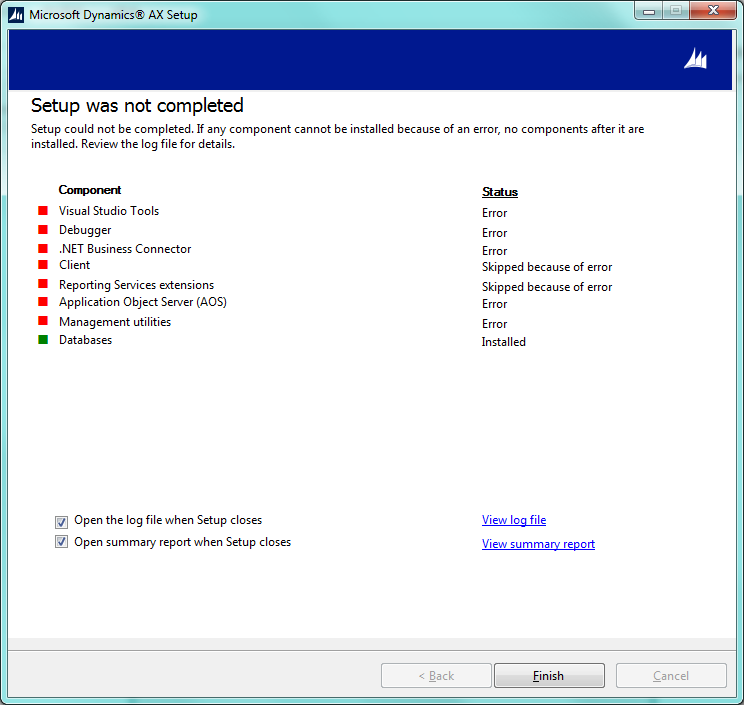
We can see that Databases were installed successfully and the rest of components were not installed. But, it is not true, if we go to Windows Services, we can find the Microsoft Dynamics AX Object Server service in the Starting status. It means that AOS was installed.If we open the summary report, we can find that the wizard assumes that AOS was not installed because “The following error/warning occurred: Time out has expired and the operation has not been completed.”So AOS was installed but not yet started. The rest of components that depend on AOS were not installed also.
- Finish the Microsoft Dynamics Wizard and wait one more hour till AOS is started.
- Run the Microsoft Dynamics Wizard
- The Welcome page opens. Click Next.
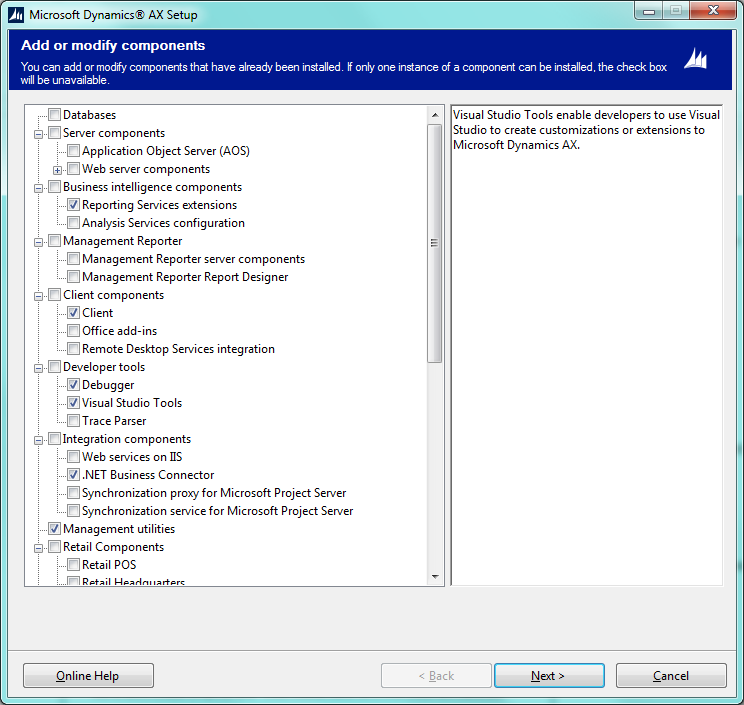
- The Modify Microsoft Dynamics AX installation page opens. Select Add or modify components and click Next.
- The Add or modify components page opens. Select the following components: Reporting Services extension, Client, Debugger, Visual studio tools, .Net Business Connector, Management utilities and click Next.
- The Prerequisite Validation page opens. Since we have already installed all required components, there are no errors. Click Next.
- The Select client preference page opens. Here, the Dynamics AX Client language is specified. I have set up the English language, Developer installation type. Select the Create a desktop shortcut check box and click Next.
- The Specify a location for configuration settings page opens. Select the Save configuration in the registry radio button. If a configuration file will be required, later we can generate it from the Microsoft Dynamics AX Configuration application (it will be available in the Windows Administrative Tools). Click Next
- The Connect to an AOS instance page opens. Specify the connection parameters that will be used by the Client. I leave the default ones as they fit me. The parameters should match the AOS parameters that were specified in step 16.
Note that on this step, the AOS should run (to review the service status go to Windows Services > Microsoft Dynamics AX Object Server).

- The Specify Business Connector proxy account information page opens. Specify the domain user that will be used by the .Net Business connector to log in to Dynamics AX. The Business connector is used by the SSRS reports. I will set up my domain account and click Next.
- The Specify a Reporting Services Instance page opens. The Instance name field will be filled in by default. I leave the instance name and the Deploy report check box selected, and click
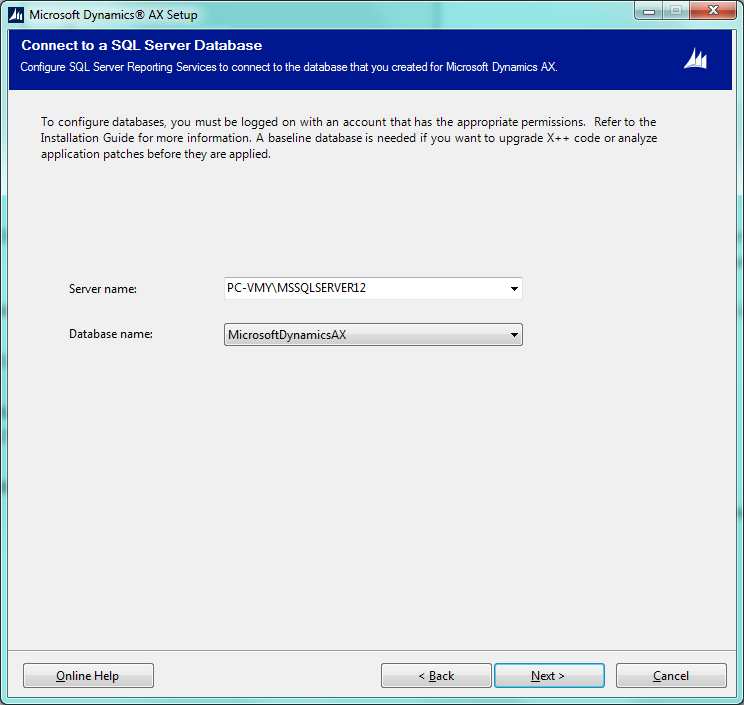
- The Connect to a SQL Server Database page opens. Here we should specify the SQL server and the database name where the Dynamics AX database was installed. In my case, it is:
- The Prerequisite validation page opens. We already were at this step so now we don’t have any validation errors. Click Next.
- The Ready to install page opens. Click Install. This process will take about 0.5 hour.
- When the setup is complete, the Setup was completed successfully page opens. Click Finish.
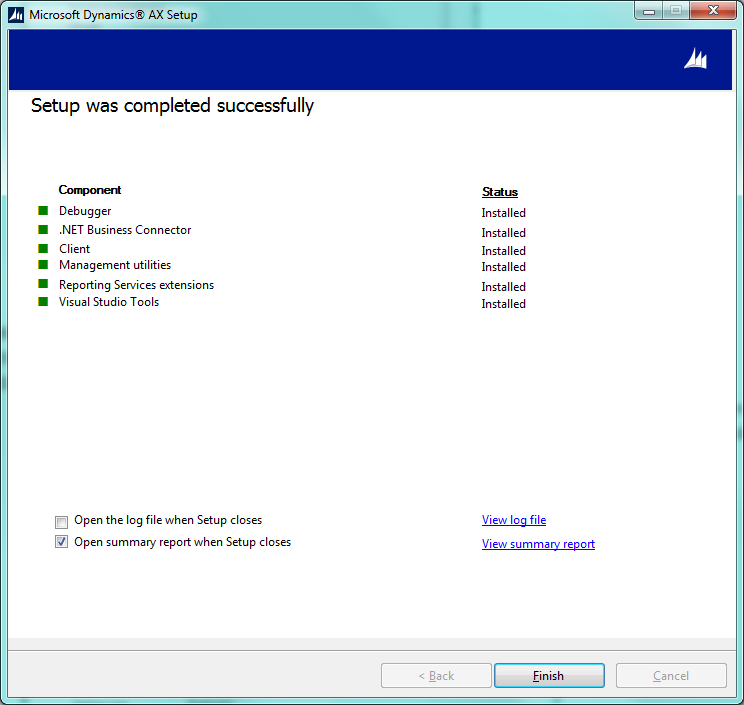
Congratulations! The Dynamics AX 2012 was installed successfully. Let’s try running it. Go to
Windows >
All programs >
Microsoft Dynamics AX 2012. The Dynamics AX Client opens. For the first time, this process will take about 30 min.
Summary
All components cannot be installed in one run because the AOS start takes longer time than the Setup assumes. So if you don’t want to see the Setup was not completed page, set up the Dynamics AX components in two steps:
- Run the Setup and install the Databases and Application object server Wait till AOS is started.
- Run the Setup and install the rest of components.
Источник:
http://www.dynamicsaxtraining.com/dy...n/installation
 25.12.2014, 18:11


 Похожие темы


 Линейный вид

