Источник:
http://atinkerersnotebook.com/2013/1...g-new-vendors/
==============
Built into Dynamics AX is a feature for managing the setup of new Vendors which allows users to request for new vendors to be added, for the purchasing group approval process by the way of workflows, and finally automatically create new vendor records. Additionally, if you are using the Vendor Portal, the on-boarding process will allow you to co-ordinate the setup of the vendor users, and if you want to, you van also have the prospective vendors update and approve their information before they are approved to ensure that their details are correct, and that they want to do business with you as well. This process is a great way to streamline the vendor setup process and is also a time saver because people are involved through the workflow process and all activities are tracked.
In this worked example we will show how the vendor on-boarding process is handled through the Vendor Requests function within Dynamics AX.
PS. I can’t take full credit for this post, I have to thank Mai Kirknel for her post that she made on MSDN that gave me all of the foundation information. If you want to view the post, you can find it here:
http://blogs.msdn.com/b/dynamicsaxsc...g-process.aspx
Configuring the Vendor Justification Workflow
Before we start the first step in the process we need to create a simple workflow for the approval of the initial new vendor request. This will allow the purchasing department to quickly weed out the requests that shouldn’t be considered in the first place.
How to do it…
To configure the
Vendor add justification workflow, follow these steps:
- From the Setup group on the Procurement and sourcing area page, click on the Procurement and sourcing workflows menu item.
- If you do not already have a Vendor add justification workflow defined, click on the New button in the New group of the Workflow ribbon bar.

- When the procurement workflow template selection dialog box is displayed, select the Vendor add justification workflow template and click the Create workflow button to create the workflow shell.

- When you return to the Procurement and sourcing workflows form, double-click on the Vendor add justification workflow workflow to open up the designer.

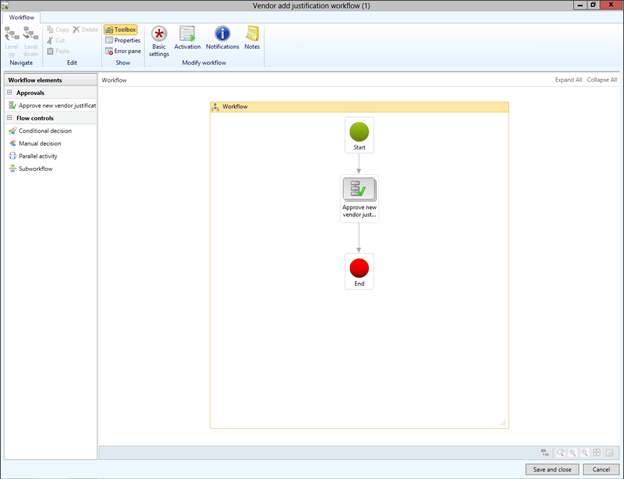
- When the workflow designer is displayed, create a simple flow that just has the Approve new vendor justification step and then click on the Save and close button to save and activate the workflow.
Creating a New Vendor Request Via the Employee Self Service Portal
Once you have the
Vendor add justification workflow defined, users are able to request new vendors through the Employee Self Service Portal and then submit them for approval.
How to do it…
To submit new vendor requests through the Employee Self Service Portal and then submit them for approval, follow these steps:
- New Vendor Requests are initiated from the Employee Self Service Portal by clicking on the Vendor requests link within the Order Products group.
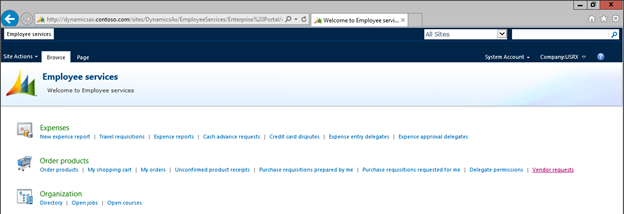
- When the Vendor requests form is displayed, click on the Vendor request button within the New group of the Requests ribbon bar.

- When the New vendor request dialog box is displayed, fill in the Vendor Name, and also the First name and Last name of the main contact that you have for the new vendor.

Note: In this example we also checked the No online capabilities box to simplify the process. At the end of this walkthrough we will show what additional steps are enabled when this checkbox remains unchecked.
- After you have filled in the basic information, click on the Create button to create your new vendor request.
- This will now take you to a more detailed form where you can start filling out more information about the vendor. Start off by opening up the Vendor address details tab, and clicking on the Add button to add a new address for the requested vendor.

- Update the address details for the vendor request and then click on the Save and close button to return to the maintenance form.

- Then open up the Vendor contact details and add any relevant contact information like e-mails and phone numbers.

- If you have personal contact information for the contact person, then open up the Contact person contact details tab, click on the Add button and add that information as well.

- We need to add at least one entry in the Procurement details category list.
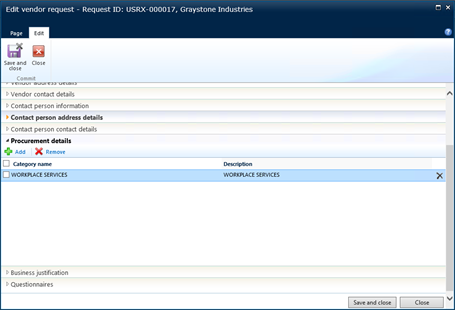
- And finally open up the Business justification tab and fill in any of the information that the Purchasing department have configured as a justification checklist.

- When you are done entering in all of the shell information for the vendor request, click on the Save and close button to update the information.
- Once you have saved the data, then you will be able to see a Submit button in the workflow toolbar. To start the approval process, just click the Submit button.
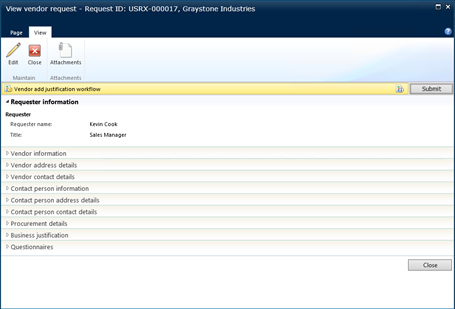
- If you have any comments that you want to attach to the submission then you can add them in the Comments dialog box, and then click the Submit button.

- Now you will be able to see your new vendor request, and also see the status of the request which should be Request submitted.

Approving New Vendor Add Justification Requests
Once the new vendor request has been submitted, the workflow that you configured for the
Vendor add justification will start notifying the necessary people that there are requests that need to be approved.
How to do it…
To approve vendor requests through the
Vendor add justification process, follow these steps:
- Once a new vendor request has been submitted, if the user is involved in the approval process then they will receive notifications through all of the channels that you have associated with the workflow, including the notification list and also the pop-up notifications through the tool bar.

- To sell all of the new vendor requests, click on the Vendor Requests menu item within the Vendor requests folder of the Common group of the Procurement and sourcing area page.
- As new vendor requests are entered by the users, they will show up here in the Vendor requests form. Click on the new vendor request that you just entered.

- You are able to update any of the information associated with the New Vendor Request, and you can approve it just by clicking on the Actions button in the workflow toolbar, and selecting the Approve option.

- If you want to add any comments to accompany your approval, then you can add them in the Comments dialog box before you click on the Approve button.

Note: If you want to track the progress of the workflow and any other comments associated with it, then you can always click on the Actions button in the workflow toolbar and select the View history option. This will allow you to track all of the steps that have occurred while processing this particular workflow instance.

- If you click the Close button, you will be returned to the Vendor requests list page, and you will see that the status of the vendor has now been changed to Vendor Invitedwhich means that they are now progressing through into the vendor setup stage.

Configuring the Vendor Application Approval Workflow
Before we start the next step in the process we need to create a simple workflow for the approval of the addition of the new vendor through the vendor request.
How to do it…
To configure the
Vendor add application workflow, follow these steps:
- From the Setup group on the Procurement and sourcing area page, click on the Procurement and sourcing workflows menu item.
- If you do not already have a Vendor add application workflow defined, click on the New button in the New group of the Workflow ribbon bar.

- When the procurement workflow template selection dialog box is displayed, select the Vendor add application workflow template and click the Create workflow button to create the workflow shell.

- When the workflow designer is displayed, create a simple flow that just has the Review new vendor application step, an Approve new vendor application and then click on the Save and close button to save and activate the workflow.

Approving New Vendor Applications
Once the vendor has been approved through the justification approval process, it moves on to the application approval process which allows the purchasing department to add the final details required for the vendor, and when it is approved will also create the new vendor record for you.
How to do it…
To approve a new vendor application, follow these steps:
- To see all of the pending vendor requests, click on the Vendor profile pending approval link within the Vendor Requests folder of the Common group on the Procurement and sourcing area page.
- As new vendor requests are initially approved by the users, they will show up here in the Vendor profile pending approval form. Click on the new vendor request that you just entered.

- This will open up a simplified Vendor details form with the information from the vendor request. There are some fields that need to be populated still though, so click on the Update profile button within the Maintain group of the Vendor ribbon bar.

- Fill in the required fields such as the Vendor group and the Currency, and when you have finished click the Save button within the Maintain group of the Vendor ribbon bar.

- You should notice that the Actions button will change and now be labeled Submit which means that all of the necessary information has been updated in the record.

- Click the Submit button, enter any additional comments that you want to be associated with the workflow, and then click the Submit button in the dialog box.

- This will then notify the reviewer in the workflow that they have a new vendor request that needs to be reviewed. They are able to open up the request and from the Actions workflow menu item click on the Review new vendor application option.

- When the Vendor application review dialog box is displayed the reviewer is able to enter in any comments and then click the Review new vendor application request button to move it onto the next step in the workflow.

- The final step in the workflow is to approve the vendor application. After being notified, the approver is able to open up the vendor request and from the Actions menu button in the workflow toolbar they can route the request back to the approver, or click on the Approve button to complete the vendor approval process.
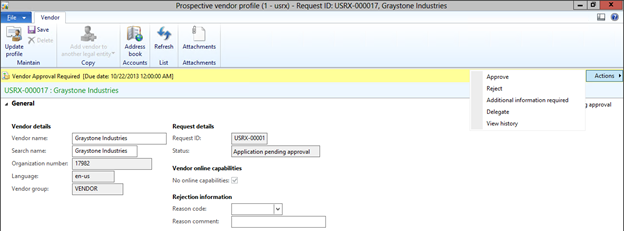
- The approver is then able to add any comments to the approval, and then click Approve to finish the process.

- After the approval is completed, the status of the vendor request will change to Application Approved and the user is able to click the Close button to finish the process.
How It Works…
If you look at the
Vendors tables, you will notice that there is a new vendor record that has automatically been created based of the vendor request.

All of the information from the Vendor Request would have been copied over to the new vendor record that was created.

How cool is that.
Configuring the User Provisioning Request Workflow
In addition to configuring the vendors, there is also a process built into Dynamics AX that allows you to manage the provisioning of user access to the Vendor Portal, by allowing vendors to request access, and then allowing the purchasing department to approve the access and then having the system administrators provision the user.
How to do it…
To configure the workflow for user provisioning requests, follow these steps:
- From the Workflow folder of the Setup group on the System administration area page, click on the User workflows menu item.
- Double-click on the User request workflow workflow to open up the designer.

- Configure the workflow to have a review and also an approval step within the workflow and then click the Save and close button to activate the workflow.

Requesting a Portal User Account for a Vendor
Once the workflow has been configured you can request user accounts to be configured for the vendors through the Procurement area.
How to do it…
To request a new user account for a vendor, follow these steps:
- Click on the Vendor user requests menu item within the Vendor requests folder of the Common group of the Procurement and sourcing area page.
- When the Vendor user requests list page is displayed, click on the Add vendor user button within the New group of the Requests ribbon bar.

- When the User request details form is displayed, select the Vendor account, Person, and also specify a User alias for the request and press CTRL-S to save the record.

- Once all of the required fields are entered, the Submit button will be displayed on the workflow toolbar. Click it to kick of the user provisioning workflow.

- When the workflow comments dialog box is displayed, enter any notes that you want to accompany the workflow and then click the Submit button.

- Finally, click on the Close button to exit out of the User Request Details form.
Configuring a new Vendor Portal User Account
Once a new vendor user request has been submitted, then it will start the
User request workflow to co-ordinate the setup and approval of the records.
How to do it…
To configure a new user account for the vendor, follow these steps:
- Once a new vendor user request has been submitted, if the user is involved in the approval process then they will receive notifications through all of the channels that you have associated with the workflow, including the notification list and also the pop-up notifications through the tool bar.

The system administrator will be able to see all of the user’s details within the Vendor user requests maintenance form.

- In my system I am using Active Directory authentication, so the first step is to open up the Active Directory Users and Computers console, and click on the Add New User icon in the ribbon bar.

- Then create a new user for the Vendor contact.

After you have created the new user account, close down the Active Directory Users and Computers console.
- Now we need to add the vendor as a user within Dynamics AX. To do this, click on the Users menu item in the Users folder of the Common group in the System administration area page.
- Since the user is already in Active Directory, click on the Import button within the New group of the Users ribbon bar.

- Search for the Active Directory user, check it, and then click Next, accepting all of the defaults for the user until the user account has been created.

- Once the user account has been created, open up the record, and then click on the Relations button in the Setup group of the User ribbon bar.

- When the User Relations form is displayed, click on the New menu button to create a new relation.

- Select the vendor contact from the Person drop down list.

- Then add a relation of type Vendor to the new vendor record that we created.

- Click the Close button to exit out of the form.
- Then click on the Assign roles button within the User roles tab. Select the Vendor (external) role, and click the OK button.

- After the Vendor user is configured, click on the Close button to exit out of the maintenance form.

- Now from the User request details form, you can move the workflow to the next step by select the Complete option within the Actions workflow menu button.
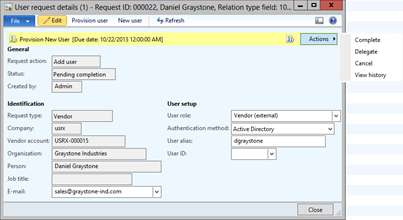
- If you have any comments then you can enter them in, otherwise just click on the Complete button to finish the task.

- Now that the user setup is complete, the approver will be notified that they have a pending approval task.

- If they open up the User request details form for the new user request, they can approve the update just by clicking on the Approve option within the Actions workflow menu.
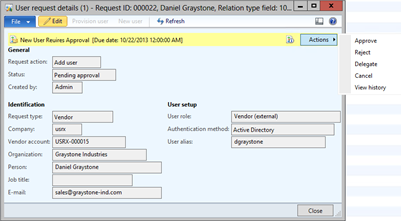
- If they have any comments then you can enter them in, otherwise just click on the Approve button to finish the approval.

- If you look at the Vendor users requests the status of the user setup should now say Completed.
How it Works…
Now the vendor is able to log into the Vendor Portal using the credentials that they were assigned by the systems administrator and access all of their information.

Very cool.
Allowing Prospective Vendors to Update Their Information
There is one final area that we will describe in this walkthrough that allows the Prospective Vendors to be involved in the setup process even before they are approved vendors. This allows the Prospective vendors to update their proposed vendor details themselves and double check vendor classifications etc.
How to do it…
To allow prospective vendors to access their details through the Enterprise Portal, follow these steps:
- To include Prospective Vendors in the vendor approval process, create the vendor request just like we did in the previous example, but this time make sure that you uncheck the No online capabilities checkbox.

After the vendor has gone through the justification approval process, the system administrator will be notified that there is a new user request pending for the prospective vendor.

- To see the request, click on the Prospective vendor user requests menu item within the Vendor requests folder of the Common group in the Procurement and sourcing area page.
- From there you will see the new prospective vendor user request.

- You just need to provision the new user account almost exactly the same way as the Vendor User account was set up in the previous section, except link the record to a Prospective vendor relation and assign it the Vendor prospect (external) role.

- When it’s finished, click on the Complete option from the Actions workflow menu button.

- If they have any comments then you can enter them in, otherwise just click on the Complete button to finish the approval.

- Then the approver will be notified of the setup request and they are able to click on the Approve menu option of the Actions workflow menu button to complete the process.

- If they have any comments then you can enter them in, otherwise just click on the Approve button to finish the approval.

- Once you have completed the process, the Prospective Vendor User Request should have the status Completed.

How it Works…
This will allow the prospective vendor to log into the Enterprise portal, and access the
Prospective vendor registration form with all of the information from the Vendor request.

They are able to update any of their details, and also need to confirm the
Category information that has been associated with their prospective vendor account.
 Note:
Note: They also have access to the
Attachments functionality, so if they want to give you any other associated documentation, then they can do that from here as well.
Once they have done that, the
Submit button will be displayed in the workflow toolbar, and they can mark the vendor as being updated and ready for approval.

They can add any notes to the submission if they like and then click the
Submit button.

Once they have submitted their profile, they can exit from the form.

After the prospective vendor has returned the information, then the reviewing process will run just like it did in the prior example.
 Summary
The vendor on-boarding process makes the setting up of vendors so much easier, especially when you have multiple people involved in the setup and approval process.
In this example we have just shown a couple of the options that are available to you. Once you have mastered the basics, you can try the following:
- Adding questionnaires for gathering additional information from the vendors during on-boarding
- Tweaking the vendor justification options
- Automating the user setup process workflows
- Adding multiple routings and approval steps for the workflow processes.
This is not going to be everyone’s cup of tea, and may be overkill for some of you, but for those that do have more formal processes in place for adding vendors, this will definitely be a life saver and allow you to manage the on-boarding process a lot more effectively. Give it a go, I’m sure it will be worth the setup.
Want to learn more?
 Then pick up a copy of my book and show your support to a struggling author
Dynamics AX is built on a number of foundation products from Microsoft that are used to make it bigger, better, and stronger than the average business system. Taking advantage of these products will make your life easier. Use these tools to maximize the efficiency of your business management, taking advantage of a powerful and centralized tool set.
“Extending Microsoft Dynamics AX 2012 Cookbook” will show you how to use tools that you already have to extend out Dynamics AX and discover potential new directions. You will be surprised at what you can do on a shoestring budget. The book will allow you to streamline your work processes, and use the system’s powerful and centralized features to the advantage of your organization.
“Extending Microsoft Dynamics AX 2012 Cookbook” will show you how to maximize the potential of Dynamics AX with common and popular tools to enhance your business management systems. We will begin by exploring how to extend Dynamics AX out with SharePoint. After this, the book will guide you through important elements in maximizing business management efficiency, focusing on key aspects like reports, dashboards, and workflows. The book will then finish by teaching you how to customize your management systems, achieving a comprehensive coverage of the most important extension processes relevant to you and your business with very little programming.
This is a book for those of you that want to make the most out of Dynamics AX by using what you already have, and without breaking the bank.
FACEBOOK: http://www.facebook.com/extendingdynamicsax
PACKT:
http://www.packtpub.com/extending-microsoft-dynamics-ax-2012-cookbook/book


Источник:
http://atinkerersnotebook.com/2013/1...g-new-vendors/


 Then pick up a copy of my book and show your support to a struggling author