
|
|
#1 |
|
Участник
|
Gareth Tucker: Enabling SharePoint Integration on a CRM Online Trial
Источник: http://garethtuckercrm.com/2014/07/2...-online-trial/
============== These instructions will walk you through how to enable a SharePoint Online trial to go with your CRM Online trial and how to activate the native integration between those products. First, setup a CRM Online trial, if you don’t have one already. Microsoft CRM Online is part of Office 365 so a CRM Online trail actually provisions an Office 365 trial as well. A cool byproduct of that is we can extend our trial to include the trial of other products on the Office 365 platform, including SharePoint Online. Go to your Office 365 admin page at: https://portal.office.com/default.aspx If prompted, enter the credentials you entered when you requested your CRM Online trial.  From the Admin menu navigate to the Office 365 Admin center: 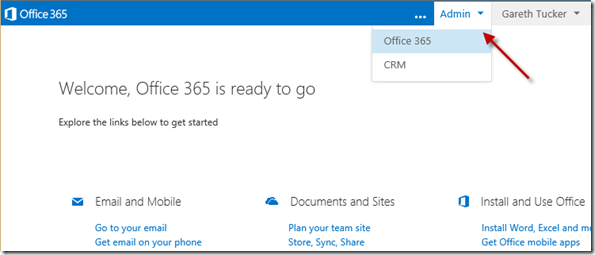 Click on Purchase Services:  Scroll down until you see the option below and then click the Trial link:  Click through the next couple of screens to activate the Trial:  You will land back on the Office 365 Admin Center Dashboard where you can see the health/status of the O365 services that you have provisioned. Note your SharePoint instance has a status of “provisioning…”. We need to wait for that to complete: s  Give it 5 minutes and then refresh your browser and you should see:  We now have a trial instance of SharePoint Online. Next step is to enable the SharePoint integration over in CRM. The first thing we will need in CRM is the SharePoint URL. To locate that launch SharePoint from the Admin menu:  You will be taken to the Site Collections page in SharePoint. Copy your URL that resembles the below: 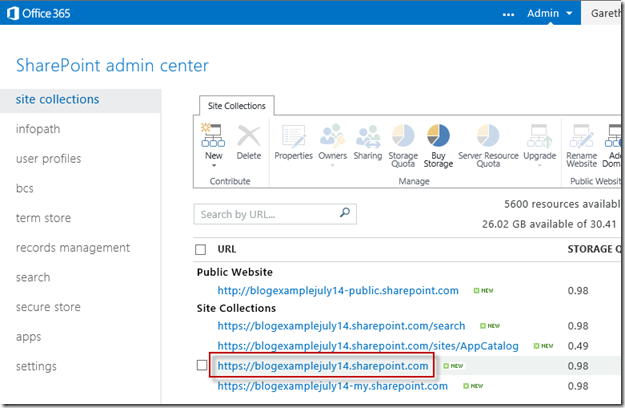 Next, head over to CRM by clicking the CRM link from the Admin menu…  … and click OPEN on the next page: 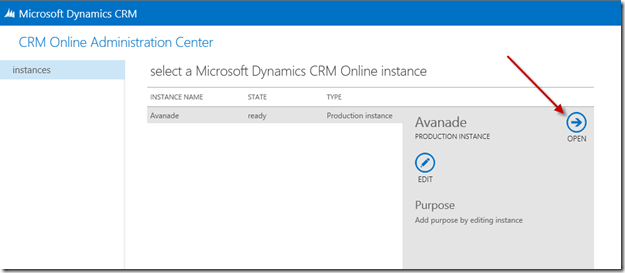 CRM will launch. If you have not previously dismissed the “Enable Server-Based SharePoint Integration” notification in the CRM header you can click the Enable Now button to pop the configuration wizard.  Otherwise, from the SETTINGS menu select Document Management and then “Enable server-based SharePoint integration”:  Either way, you will end up on the screen below, where you need to paste in that SharePoint URL you grabbed earlier, and then click Next:  On the next screen, give CRM a few moments to run some validations, and then click Next:  On the final screen, click Finish:  As that last screen told us, we have now linked our CRM Online and SharePoint Online servers but we have a few more steps to complete to guide CRM on how it should auto-create Document folders for us. If you are not there already go to SETTINGS –> Document Management and then click on the link below: 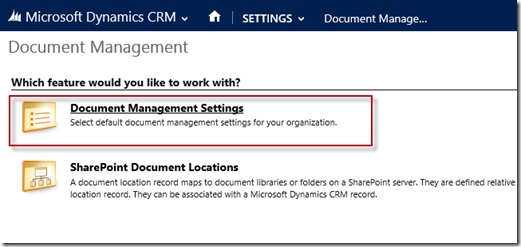 On the next screen we need to select the CRM Entities that we wish to enable for Document Management / SharePoint Integration:  You will notice some entities are selected for you. These are the entities where Document Management is enabled by default on the entity definition. You can toggle this setting from either place. Make your selections, paste that SharePoint URL in again, and then click Next:  On the final screen you need to choose how you want your SharePoint folders to be structured. If you leave the Based on entity option unchecked you will end up with individual folders in SharePoint for each entity and then each instance of that entity – e.g.: 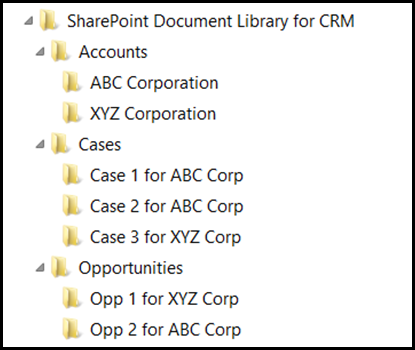 If instead, you prefer to have say an Account-centric hierarchical folder structure like the below…  .. you can enable that by configuring the SharePoint-CRM integration as per below: 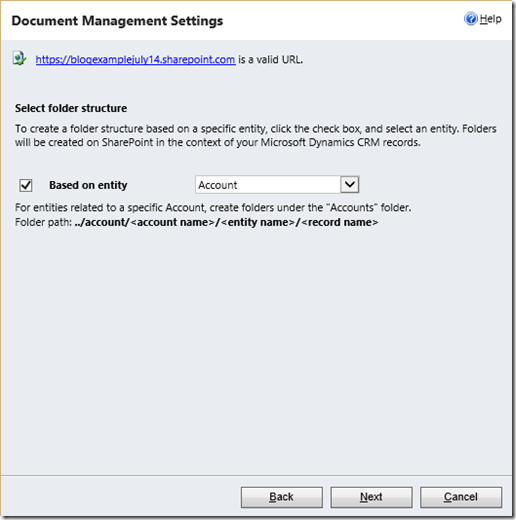 Click Next on the above screen and a message will pop informing you that Document Libraries are being created for each Entity:  Click Ok and the next screen will indicate the status of the provisioning:  Once the Status column in that indicates success for all selected entities click Finish – and you are done. To test this out, pick one of the entities you enabled for SharePoint integration and either pop an existing record or create and save a new record. I am going to open an existing Account record:  With a CRM record open in front of you, access the Related Records menu (the little down arrow after the record name in the blue navigation bar) and click DOCUMENTS:  Up until this point a Document folder does not yet exist on the SharePoint server for this record. A Document Library exists for the entity (e.g. there will be an “Accounts” library) but that library is initially empty. Individual folders for each instance of an Entity are created on demand. A message box will prompt you to confirm you want a folder created, click Confirm:  A few moments will pass and then the Documents View will appear displaying the contents of the Document Folder that was created on SharePoint:  This server-based CRM-SharePoint integration is a new feature introduced in the Spring 14 release for Dynamics CRM 2013. As of today (7-20-14) it only supports integration between CRM Online and SharePoint Online. If you want to use an on-premise version of either you need to go with the older integration architecture (i.e. iframe in the special list component). The new server-based integration represents each SharePoint document as a record in CRM, allowing the use of a normal Associated view rather than an iframe. More importantly, it allows you to map metadata from the CRM entity to the SharePoint document record, improving search within SharePoint – but I won’t go into that here. To test the integration, use the UPLOAD button to save some documents into SharePoint. They will be stored in SharePoint, linked to your CRM record and then from that point on they will be directly accessibly from CRM: 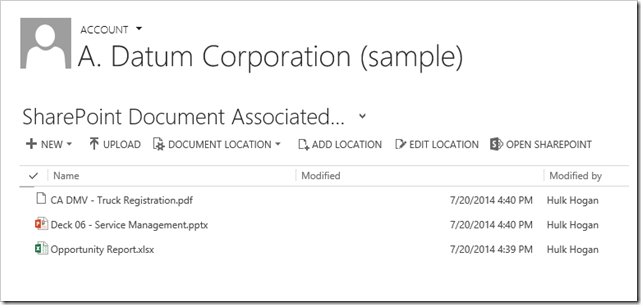 I spoke earlier about the SharePoint document folder structure. If you plan to access all documents via CRM and never use the SharePoint user interface then the folder structure is irrelevant. If you are curious you can click the OPEN SHAREPOINT button and see how things look there:  Once I upload documents to my Account and also to one of the Account’s Opportunities, I end up with this folder structure in SharePoint, within the Account Document Library:  The files listed are linked at the Account level. Within that opportunity folder I have a sub-folder per Opportunity (in my case there is only one):  And within that folder, I have that Opportunity’s documents:  You will notice that the folder that was created for the Opportunity was named using the concatenation of the Opportunity’s name and its unique GUID. The same approach was used for the Account folder and for every folder the CRM-SharePoint integration creates:  Back in CRM, on that Opportunity record, if I go the Documents view under Related Records and click the EDIT LOCATION button you will see where CRM stores the Site details and folder name for this record:  This is important to understand. CRM is not dynamically calculating the folder name each time it goes off to SharePoint to retrieve the documents. It stores the folder name in the CRM database when it originally creates it. This allows for the Opportunity to get renamed in CRM without causing the CRM-SharePoint integration to break. In that instance, the worst that happens is the folder name in SharePoint becomes out of date and anyone browsing directly in SharePoint will see the original name. And that can be updated, you would just need to edit the folder name both in SharePoint and also in CRM via this Edit Location screen. Hope this helps someone. Источник: http://garethtuckercrm.com/2014/07/2...-online-trial/
__________________
Расскажите о новых и интересных блогах по Microsoft Dynamics, напишите личное сообщение администратору. |
|
|
|
|
|