
|
|
#1 |
|
Участник
|
dynamicsax-fico: Dynamics 365 General Journal Excel Imports
Источник: https://dynamicsax-fico.com/2017/12/...excel-imports/
============== Within this post I would like to share some of the experiences that I made with the import of transactions from Excel to D365 general ledger journals. The story began in the general journals form, which allows users opening, editing and re-importing accounting transactions in Excel. 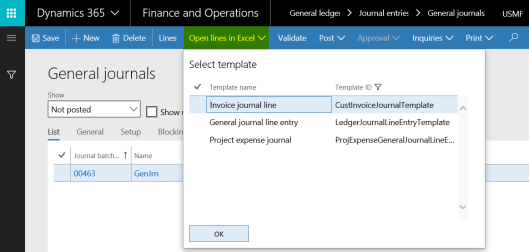 The standard general journal line entry template that ships with D365 opens an Excel document similar to the one shown in the next screenprint that has (1) a link to the general ledger journal batch number and (2) a link to the main account(s) used. 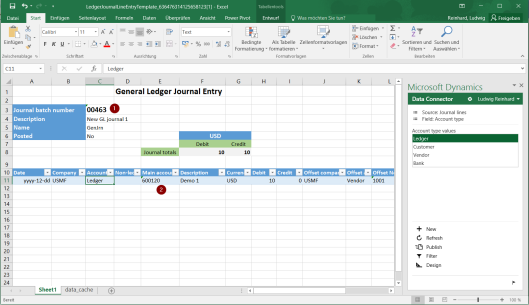 Those linkages and functionalities are nice. However, I wanted to (a) enter main accounts and financial dimensions and (b) create new journals and not open already existing ones. Within the following, we will see how (a) and (b) can be achieved. (a) Enter main accounts and financial dimensions Fixing the first issue is easy and can be achieved by adding the account display value field via the workbook designer. The next screenprint exemplifies this. 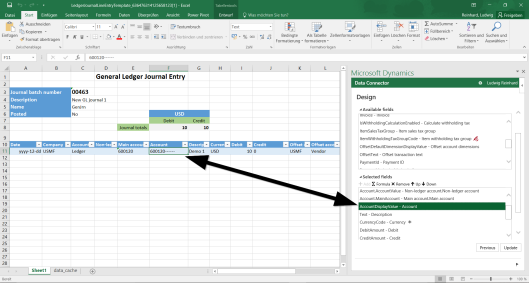 A disadvantage of using the account display value field for recording main accounts and financial dimension combinations is that you cannot easily identify the sequence of the different financial dimensions used and thus do not know how to enter your transactions. That is because this sequence is defined in the following integration form in the general ledger module. 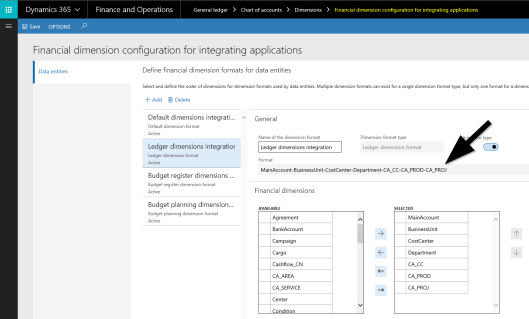 A second disadvantage of entering the main account-financial dimension combinations in a single field is that no tooltip or lookup is available that would help users entering their transactions. Luckily this disadvantage can easily be overcome by implementing a minor system modification that is described on the following website: https://docs.microsoft.com/en-us/dyn...sions-overview. The next screenprint that was taken for a different D365 environment that has this modification implemented illustrates that the system modification allows entering main accounts and financial dimensions in separate columns of the Excel template.  Even though the workbook designer and the optional system modification help to overcome my first issue, you will quickly notice that all Excel design changes that are made via the Office add-in designer are gone the next time you open the Excel template. To fix also this problem, one has to design its own template. Creating and designing an own template might sound complicated. However, you do not have to design everything from scratch but can rather make use of the things that are already available. In other words, you can make use of the existing standard templates and easily modify them yourself as required. The only thing you need to do to realize that is opening the document templates form… 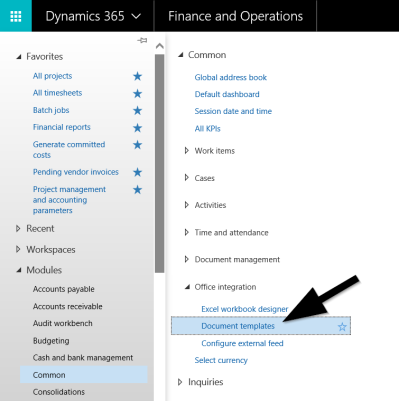 …identify the existing template and download it. 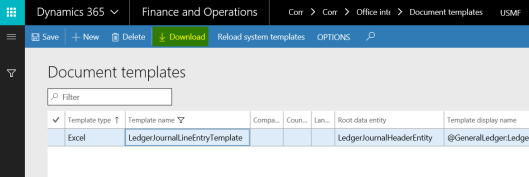 When downloading and saving the template, take care of the name that you give to this file because this name will be important later on when making the file available for usage. 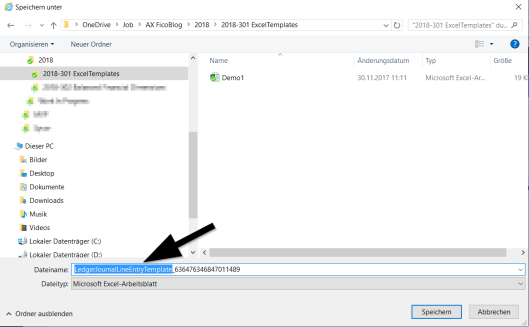  In my example, I simply changed the template name by replacing the ending numbers with L1. In my example, I simply changed the template name by replacing the ending numbers with L1.Once the template is downloaded and saved, you can open it in Excel and start creating your own design. 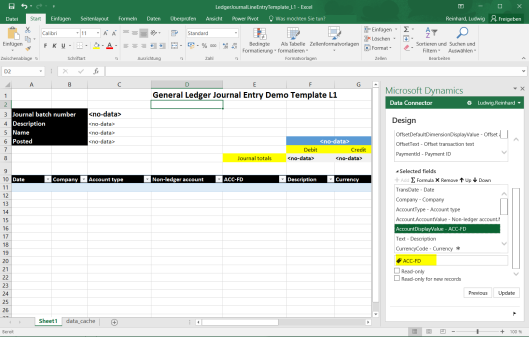 After all design change are made, the new template can be made available by creating a new document template and importing the Excel document as illustrated in the next screenprint.   Please note that the template name defaults to the file name that has been uploaded. In my example, it ends with _L1. If you do not delete this suffix and make use of the original template name (‘LedgerJournalLineEntryTemplate’), the upload will succeed but you won’t be able to make use of the document template. Please note that the template name defaults to the file name that has been uploaded. In my example, it ends with _L1. If you do not delete this suffix and make use of the original template name (‘LedgerJournalLineEntryTemplate’), the upload will succeed but you won’t be able to make use of the document template.Provided that you managed creating your new template, it finally becomes available for selection in the general journals form…  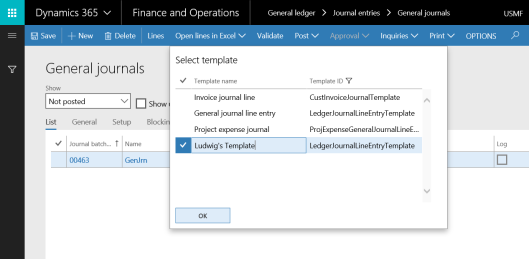 … and can be used for recording accounting transactions.  (b) Create new journals Using the general journal Excel add-in is nice. Yet, you might have noticed that all my Excel documents shown before had a link to an already existing general ledger journal. What I wanted to do though was creating new journals directly from Excel and not creating a journal in D365 that can be opened in Excel. In the following, I will show you how creating new journals can be realized by making use of the Excel document template functionality. To make this exercise a bit more challenging, I decided to demonstrate the creation and posting of a new journal by ‘copying’ the lines from an already posted journal. For that reason, I selected one of the already posted journals and transferred all lines into my newly created template.   Once that export was done, I put my cursor into the header section and selected ‘New’ in the Office add-in data connector, which allowed me entering a new description and name that I could publish.  As a result a new batch number became visible (00459)…  … and a new journal was created in the D365 web client. 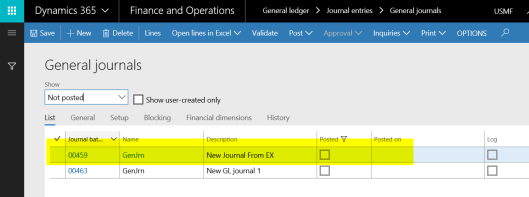  There is no lookup available for the journal name. You thus have to know and enter the name before you can create a new journal through the Excel add-in. There is no lookup available for the journal name. You thus have to know and enter the name before you can create a new journal through the Excel add-in.Happy about what I have achieved so far, I continued my exercise by changing the existing lines that I could still identify in the template. Trying to publish those modified lines to my newly generated general ledger journal went, however, terribly wrong and I got many error messages. After a while, I noticed that something might be wrong with the journal line association. To check this, I added the journal batch number field into my template and noticed that the existing lines still had a relationship to the old and posted journal no. 00001. 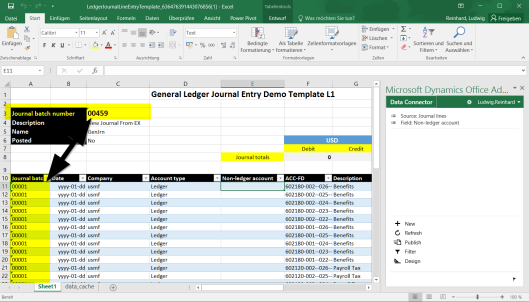 When I tried to overwrite those lines, I basically tried to tell D365 to delete already posted vouchers and replace them with some new ones. D365 did of course not allow me doing this and consequently generated the error messages. After becoming aware of this issue, I simply copied the existing lines from journal 00001 to the end of my template, entered the new journal batch number created (00459) and modified the posting date. 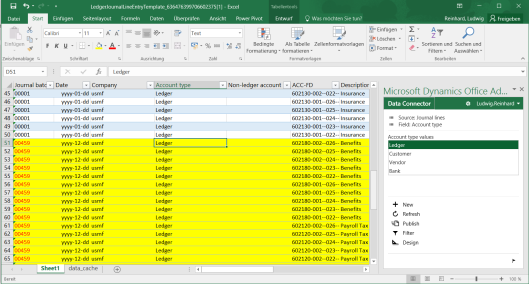 Those changes finally allowed me uploading and posting my journal. 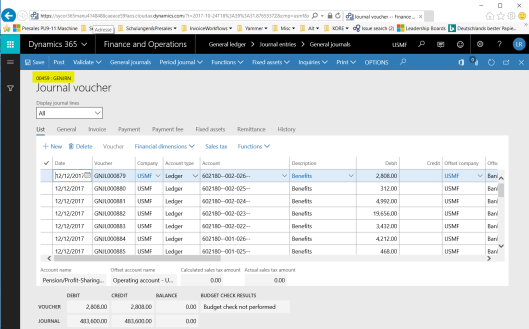 I hope that this information and the experiences that I made are helpful for you and allow you circumventing those problems when using the document template in D365. Till next time. Filed under: General Ledger Tagged: Excel integration, Import, Template Источник: https://dynamicsax-fico.com/2017/12/...excel-imports/
__________________
Расскажите о новых и интересных блогах по Microsoft Dynamics, напишите личное сообщение администратору. |
|
|
|
|
|